Bench answer
The reliable starting point
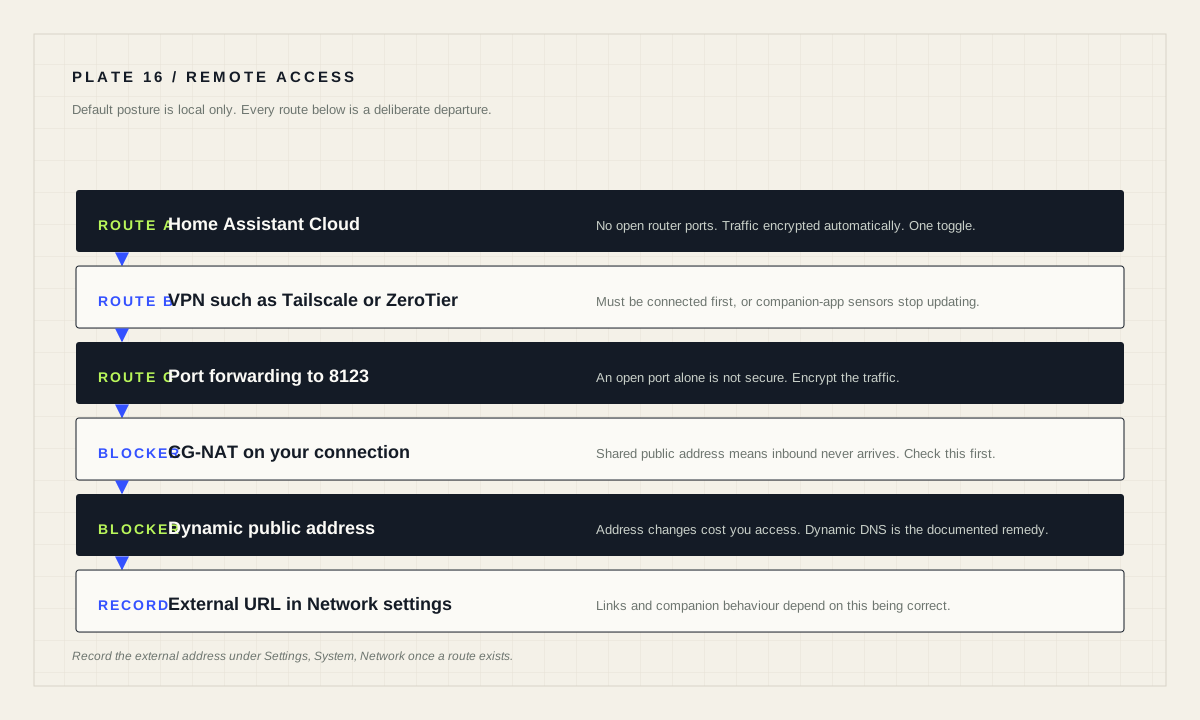
By default Home Assistant listens only on your local network. The documentation names Home Assistant Cloud as the easiest and safest option for most people because it needs no open router ports and encrypts traffic automatically. A VPN such as Tailscale or ZeroTier One is the strong self-managed alternative. Port forwarding is documented but carries an explicit caution: putting a port up is not secure on its own, and you should encrypt the traffic. Follow the securing checklist before exposing anything, then record the external URL under Settings → System → Network.
Understand the default you are changing
The remote-access documentation opens with the important sentence: by default, Home Assistant listens only on your local network, which keeps things private and secure. Everything on this page is a deliberate departure from that default, and the correct mental model is exposure budget rather than convenience.
Before departing, the documentation directs you to the securing checklist. Two of its items are unglamorous and load-bearing: centralize sensitive values in secrets — while remembering that storing them in secrets.yaml does not encrypt them — and keep the system up to date with each monthly release. An outdated instance reachable from the internet is a worse configuration than a current instance reachable only at home.
Ask what remote access is actually for. If the honest answer is “check whether I left a light on,” a method that never opens a port is proportionate. If the answer is “administer the system from anywhere,” a VPN is proportionate. Very few household needs justify a permanently forwarded port.
Home Assistant Cloud: the documented default
Home Assistant Cloud gives remote access from anywhere without opening any ports on your router and without exposing your home network to the internet. Setup is described as a single toggle in the user interface. A unique remote URL is generated for you, and all traffic between your device and your home is encrypted automatically. The subscription also funds development of Home Assistant itself.
The trade is a paid subscription and a dependency on a relay operated by someone else. That is a real trade, and it is worth naming rather than glossing over. What you buy is the removal of an entire maintenance surface: no certificate renewal, no dynamic DNS, no forwarded port to audit, no reverse proxy configuration to keep current.
For most households this is the correct answer, and the documentation says so plainly by calling it the easiest and safest option for most people. Choosing it is not a failure of self-reliance; it is an accurate assessment of which risks you are equipped to carry.
VPN: strong, self-managed, one caveat
The documented alternative is a Virtual Private Network such as Tailscale or ZeroTier One. A VPN connection must be established before you can reach Home Assistant from outside your local network, and the VPN is what makes that connection secure.
The caveat matters for anyone using the companion app: without the VPN connection established, your sensors will not update in Home Assistant. Device trackers, battery levels and app-reported sensors depend on the app being able to reach the instance. A VPN that is only connected when you deliberately open it produces a presence system with holes in it — and presence gaps then propagate into every automation that trusts them.
The fix is to configure the VPN client to stay connected rather than to be summoned. Once that is true, a VPN gives you full administrative access with no service in the middle and no port exposed to the general internet.
Port forwarding, and the caution attached to it
The documented method is to forward any port on your router to port 8123 on the machine hosting Home Assistant; you can use any free external port. The documentation attaches an explicit caution: just putting a port up is not secure, and you should consider encrypting your traffic if you access your installation remotely, pointing to Let's Encrypt with DuckDNS as the worked example.
Two structural problems accompany this route. The first is dynamic addressing: many providers issue dynamic IP addresses, which can cost you access while away, and the documented remedy is a free dynamic DNS service such as DuckDNS. The second is CG-NAT. If your provider shares one public address among many customers rather than giving you a dedicated one, inbound connections cannot reach you at all. The documentation notes this is fairly common now because of IPv4 scarcity, and that some providers charge extra for a dedicated IPv4 address.
If you diagnose in the wrong order here you will waste hours. Confirm you have a reachable public address before configuring certificates, dynamic DNS and router rules. A perfect configuration behind CG-NAT still fails.
Tell Home Assistant its own external address
Once a remote route exists, record it. Go to Settings → System → Network and enter the external URL under Home Assistant URL. This is not decorative: features that generate links, and companion-app behavior that needs to know how to reach the instance from outside, depend on it being correct.
A mismatch here produces symptoms that look unrelated to networking — notifications whose links open nothing useful, or an app that works at home and stalls elsewhere. When remote access “half works”, this field is one of the first things to verify.
# From outside your network, confirm the external route answers
curl -I https://your-external-hostname.example

# Confirm the certificate matches the hostname you configured
openssl s_client -connect your-external-hostname.example:443 -servername your-external-hostname.example </dev/null 2>/dev/null | openssl x509 -noout -subject -datesIf you self-manage, harden the host too
For manual installations the securing documentation adds host-level advice. Where SSH is used, set PermitRootLogin no in the sshd configuration — usually /etc/ssh/sshd_config — and use SSH keys for authentication instead of passwords, which it flags as particularly important if you enable remote access to SSH services. It also points to established host-hardening guidance for Debian and Red Hat systems.
Keep the security surface proportional to the exposure. A locally reachable instance behind a router needs sensible passwords and current releases. An instance reachable from the internet needs those plus encryption, a hardened host, and a habit of reading the release notes rather than clicking through them.
Before you expose anything
- Securing checklist reviewed; secrets centralized and backed up.
- Instance on the current monthly release.
- Chosen method decided on purpose: cloud relay, VPN, or forwarded port.
- If forwarding: encryption configured, and a dedicated public address confirmed.
- External URL recorded under Settings → System → Network.
- Remote access tested from a real outside connection, not only from the couch.
- Manual control of critical devices still works if remote access fails.
Source desk
Primary documentation used for this guide. Interface names and behaviors can change; confirm the current page before changing a live installation.
- Remote accessOfficial cloud, VPN and port-forwarding options plus the external URL setting.Official source ↗
- Securing your Home AssistantOfficial security checklist and extras for manual installations.Official source ↗
- Storing secretsOfficial secrets handling referenced by the securing checklist.Official source ↗
Source review completed .
Frequent questions
Does Home Assistant expose itself to the internet by default?
No. The documentation states that by default Home Assistant only listens on your local network, which keeps things private and secure.
What is the recommended remote access method?
The documentation names Home Assistant Cloud as the easiest and safest option for most people, because it needs no open router ports and encrypts traffic automatically.
Why do my phone sensors stop updating when I use a VPN?
A VPN connection must be established before your device can reach Home Assistant from outside. The documentation notes that without that connection, companion-app sensors will not update.
Why can nobody reach my forwarded port?
Your provider may use CG-NAT, sharing one public address among many customers, so inbound connections cannot reach you. The documentation notes this is fairly common and that a dedicated IPv4 address may cost extra.
Where do I set the external URL for Home Assistant?
Go to Settings > System > Network and enter the external URL under Home Assistant URL.