Bench answer
The reliable starting point
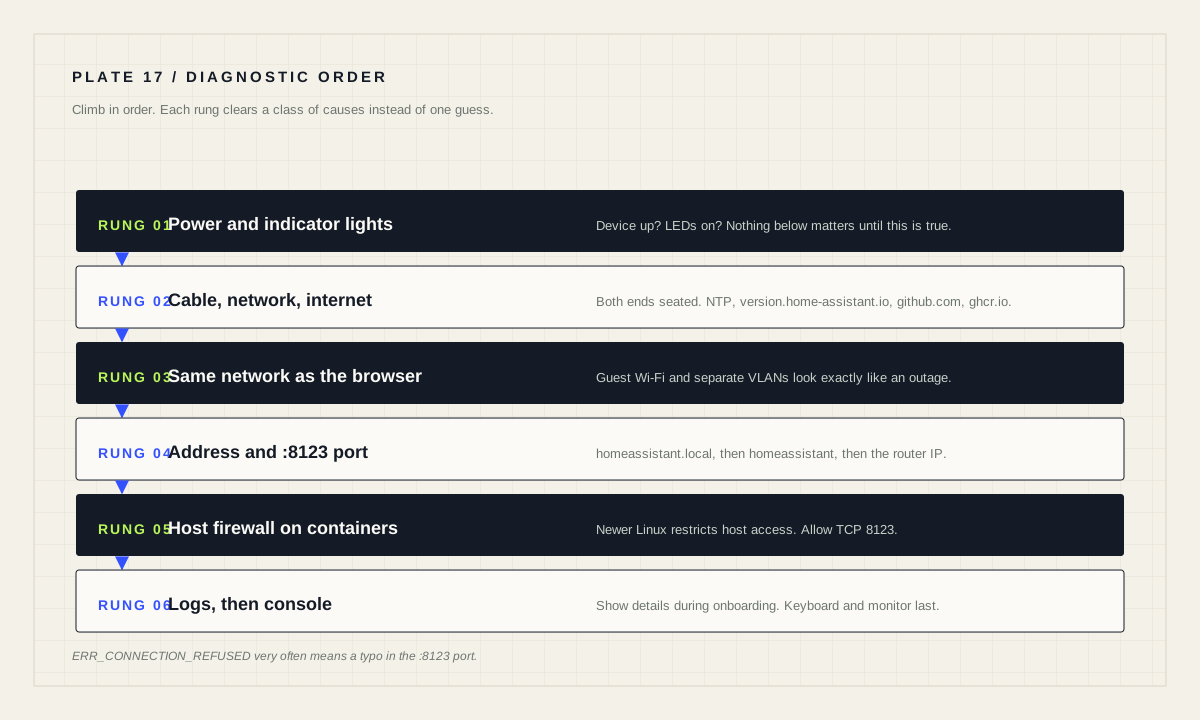
Diagnose outward from what you can observe. Confirm the device is powered and its lights are on, confirm it is on the network and your browser is on the same network, then confirm the address and the :8123 port — an ERR_CONNECTION_REFUSED message very often means a typo in the port. Try http://homeassistant.local:8123, then http://homeassistant:8123, then the IP address from your router. If it is still unreachable, open the host firewall for TCP 8123 on container installs, and finally attach a keyboard and monitor to read the console.
Why order beats intuition
When the dashboard does not load, the tempting move is to restart something. Restarting is cheap, occasionally works, and destroys the evidence that would have told you why. A fixed diagnostic order costs a few extra minutes on the easy cases and saves hours on the hard ones.
The order below follows the documented troubleshooting sequence, which starts from the most physical facts and works inward. Each step is chosen because it eliminates a whole class of causes rather than a single one. Resist skipping ahead to the interesting explanation; the interesting explanation is almost never the true one.
Record what you observe at each step, even informally. “Ping works, port refused” is a different problem from “ping fails”, and by the time you are three steps in, you will not reliably remember which you saw.
Step one and two: power, then network path
Make sure the device is powered up and its LEDs are on. Then make sure the installation is connected to the network: the Ethernet cable is plugged in at both the device and the router or switch, and the network itself has internet access. Then confirm that the system running your browser is on the same network — if your laptop is on a guest Wi-Fi network or a different VLAN, everything downstream will look broken.
Internet access matters more than people expect on a fresh or recently reset installation. During first startup, time is synchronized, so NTP must be allowed on your network. Home Assistant also completes its installation at first startup and needs access to version.home-assistant.io for version information, github.com for app store metadata, and ghcr.io to fetch updates.
Also allow for simple patience: the system may still be starting. Wait a couple of minutes and refresh, using the browser refresh control or Ctrl+R / Ctrl+Shift+R.
Step three: the address and the port
Confirm you typed the address correctly. The documentation is specific here: if the browser message includes ERR_CONNECTION_REFUSED, it is likely there was a typo in the port part of the URL, :8123. Typically the address is http://homeassistant.local:8123. On older Windows versions or with a stricter network configuration, try http://homeassistant:8123 instead.
If neither hostname resolves, stop trying hostnames. Check your router's web interface for the IP address assigned to the Home Assistant installation and enter it directly as http://x.x.x.x:8123. Hostname resolution on home networks depends on mDNS or your router's DNS behavior, and both fail in ordinary, boring ways that have nothing to do with Home Assistant.
This step is worth doing carefully because it splits the problem cleanly. If the IP address works and the hostname does not, you have a name-resolution problem. If neither works but the device answers ping, you have a service or firewall problem. If nothing answers, you are back at step two.
# Does the host answer at all?
ping -c 3 homeassistant.local
ping -c 3 192.0.2.10

# Does the service answer on the documented port?
curl -I http://192.0.2.10:8123Step four: the host firewall on container installs
If you are not running Home Assistant Operating System, the cause may be an access restriction on the host. The documentation notes that in newer Linux distributions host access is very limited, which means you cannot reach a frontend running on that host from outside the machine. The remedy is to open the host firewall for TCP traffic to port 8123; on UFW systems such as Debian that is sudo ufw allow 8123/tcp.
Two related container-specific checks belong here. Confirm the container is actually running rather than restarting in a loop, and confirm the restart policy brings it back after a host reboot. A container that exits immediately after start will present exactly like a network problem from the browser's point of view.
If the container starts and immediately stops on ARM64 hardware, look for <jemalloc>: Unsupported system page size in its output. That is a documented condition on systems with a page size larger than 4K, and setting the DISABLE_JEMALLOC environment variable to any value addresses it.
When onboarding itself stalls
Two documented onboarding symptoms have the same root. “Error installing Home Assistant” during onboarding, and onboarding stuck at “Preparing Home Assistant”, are both addressed by ensuring the network has internet access — NTP allowed, plus reachability of version.home-assistant.io, github.com and ghcr.io. After changing the network environment, wait a few minutes; Home Assistant will try to reconnect.
On the “Preparing Home Assistant” screen, select Show details to view the log files, which may explain the current status. That is the first place real information appears, and it is easy to miss because the screen looks like it is simply waiting.
This is where restrictive home networks show themselves. A DNS filter, a locked-down IoT VLAN or a firewall rule blocking outbound HTTPS to container registries will produce an install that appears to hang for no reason. The blocked destination is named in the documentation; check against that list rather than guessing.
Last rung: attach a keyboard and read the console
If you still cannot reach Home Assistant, connect a keyboard and monitor to the device to access the console and see where the system gets stuck. Home Assistant Green and Home Assistant Yellow both have documented console-access procedures, including Yellow instructions written separately for Windows and for Linux or macOS.
The console is where a network story becomes a system story: a filesystem that will not mount, storage that has failed, a service that exits at boot. If you reach this rung and find a failing disk, the correct next action is a restore from backup onto sound storage, not further repair of the existing medium.
When all rungs are exhausted, the documentation's own last step is to reach out to the community for help. Bring the evidence you collected: which addresses you tried, what the browser said, whether ping succeeded, and what the console showed. A question with that shape gets answered quickly; “it stopped working” does not.
Diagnostic order
- Device powered, LEDs on.
- Cable seated at both ends; network has internet access.
- Browser is on the same network as the instance.
- Address and
:8123port typed correctly; hostname fallbacks tried. - IP address from the router tried directly.
- Host firewall allows TCP 8123 on container installations.
- Console inspected with keyboard and monitor.
- Evidence written down before asking for help.
Source desk
Primary documentation used for this guide. Interface names and behaviors can change; confirm the current page before changing a live installation.
- Troubleshooting installation problemsOfficial symptom-by-symptom resolution order and network requirements.Official source ↗
- Linux installationOfficial host firewall guidance and the jemalloc page-size condition.Official source ↗
- InstallationOfficial installation types referenced during diagnosis.Official source ↗
Source review completed .
Frequent questions
What does ERR_CONNECTION_REFUSED mean for Home Assistant?
The documentation notes that this message very often indicates a typo in the port part of the URL. Confirm the address ends with :8123.
Which addresses should I try when the dashboard will not load?
Try http://homeassistant.local:8123 first, then http://homeassistant:8123 on older Windows versions or stricter networks, then the IP address from your router as http://x.x.x.x:8123.
Which internet destinations does a new install need?
First startup needs NTP for time synchronization plus access to version.home-assistant.io, github.com and ghcr.io.
Why is my container installation unreachable from other machines?
Newer Linux distributions restrict host access, so the frontend may not be reachable from outside the machine. Open TCP port 8123 in the host firewall, for example with sudo ufw allow 8123/tcp.
What should I do if onboarding is stuck at Preparing Home Assistant?
Select Show details to view the log files, then confirm the network allows NTP and can reach version.home-assistant.io, github.com and ghcr.io. After fixing the network, wait a few minutes for reconnection.