Bench answer
The reliable starting point
Start from the documented minimums: a Raspberry Pi 4 or 5 with at least 2 GB of RAM, a microSD card and an Ethernet connection, or a virtual machine with 2 GB of RAM and 2 vCPUs booting through UEFI. Then plan the three things that actually decide long-term reliability — durable storage rather than a cheap card, free USB ports for radio coordinators with an extension cable, and a machine that nobody else needs to reboot. Buy for the second year, not the first evening.
Begin with the documented minimums
The installation documentation gives concrete starting points. For a Raspberry Pi installation it lists a Raspberry Pi 4 or 5 with a power supply and a minimum of 2 GB of RAM, a microSD memory card and an Ethernet connection. For a virtual machine it lists minimum resources of 2 GB of RAM and 2 vCPUs, notes that UEFI is required to boot, and says you can increase those resources later if your workload grows.
Treat those numbers as a floor, not a target. They describe what boots and onboards, not what stays pleasant once you have added history, cameras, a voice pipeline and a dozen apps. The honest planning question is which of your intended workloads is heaviest, and whether you would rather buy headroom now or migrate later.
Note the recurring word in the hardware requirements: Ethernet. A wired connection removes an entire class of intermittent, hard-to-diagnose problems, and it is listed as a required tool for the ready-made hubs and the Raspberry Pi path alike.
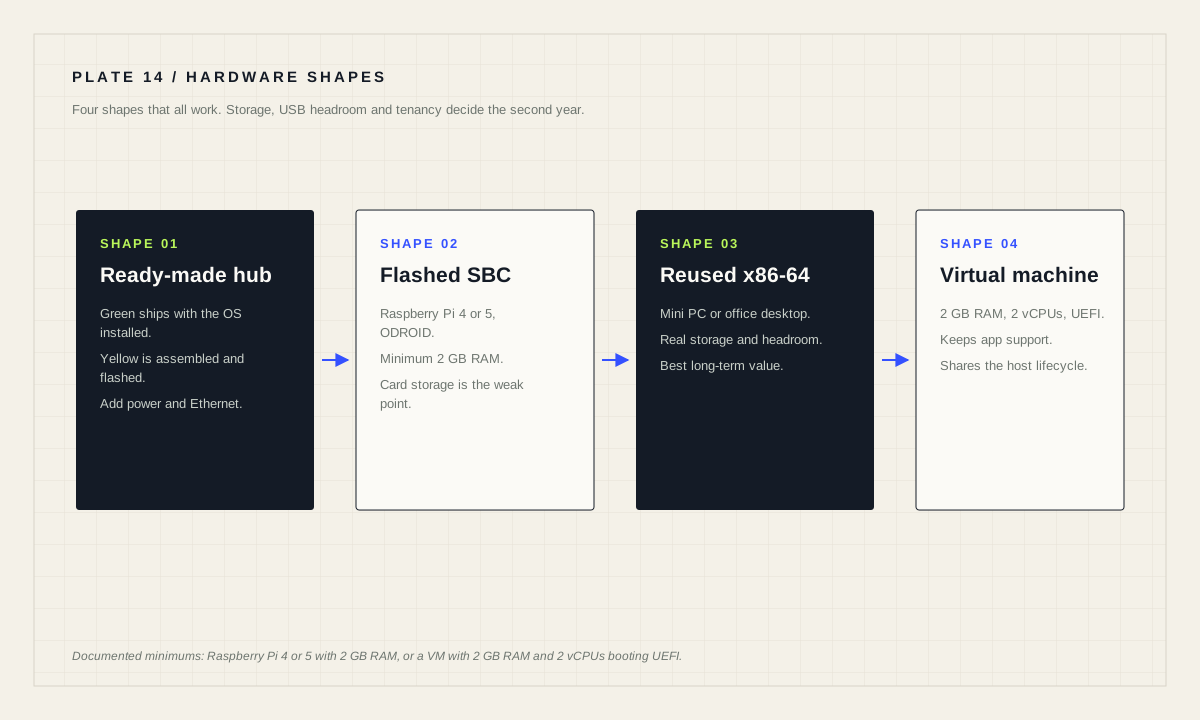
Four shapes that all work
A ready-made hub. Home Assistant Green ships with Home Assistant Operating System already installed; the documented skills are an interest in setting up a smart home and comfort with a system that has no monitor or keyboard. Home Assistant Yellow is assembled around your own Raspberry Pi Compute Module 4 with a heatsink, then flashed, and its documented tool list includes a USB storage drive and a screwdriver.
A single-board computer you flash. A Raspberry Pi 4 or 5, or an ODROID device. This is the classic path and remains well documented. Its weakness is storage, which the next section addresses.
A reused x86-64 machine. The documentation describes repurposing workstation hardware, with the skills listed as writing a boot image to a USB stick, configuring the BIOS and running headless. An old small-form-factor office desktop or mini PC is often the best value in the whole list: real storage interfaces, real power supply, and enough headroom that you stop thinking about resources.
A virtual machine on a host you already run. Prebuilt images exist for common hypervisors, and this path keeps app support while sharing hardware you already maintain. The trade is that Home Assistant now depends on the health and reboot schedule of that host.
Storage decides how the second year feels
Home Assistant writes continuously. State changes, history and logs accumulate, and consumer microSD cards are not designed for that duty cycle. The most common practical complaint from long-running single-board installations is not slowness at install time; it is a card that degrades quietly and takes the database with it.
If you choose a single-board computer, plan for durable storage from the start rather than as a rescue operation: a good-quality card treated as consumable with a tested backup schedule, or a supported path to solid-state storage. If you choose a mini PC or a virtual machine, you already have durable storage — size it with room for the recorder database to grow.
The corollary is that a backup routine is part of the hardware decision, not a separate topic. Storage that will eventually fail is acceptable when a restore is rehearsed. Storage that will eventually fail on a system whose backup has never been tested is a countdown.
Count USB ports before you count cores
Radios attach over USB. A Zigbee or Z-Wave coordinator occupies a port, and the documentation for virtual-machine installs describes passing a specific USB device through to the guest — identified with lsusb and attached by bus and device ID. If you intend to run more than one radio, count the ports on the machine you are about to buy.
Two physical details repay attention. First, USB 3.0 ports and their cabling are a well-known source of 2.4 GHz interference, which is the band Zigbee shares; a short USB extension cable that moves the coordinator away from the chassis is standard practice for a reason. Second, a coordinator sitting behind a metal case or inside a media cabinet is a coverage problem you will misdiagnose as a device problem.
If you plan to virtualize, confirm that your hypervisor can pass the exact dongle through before you buy the dongle. That verification takes ten minutes and prevents a class of failure that looks like a broken radio and is actually a broken assumption.
# Identify a radio coordinator before passing it through
lsusb

# Example line for a Zigbee dongle:
# Bus 003 Device 003: ID 1a86:55d4 QinHeng Electronics SONOFF Zigbee 3.0 USB Dongle Plus V2

# Stable device paths survive replug better than /dev/ttyUSB0
ls -l /dev/serial/by-id/Reusing an old laptop or NAS: read the fine print
Reuse is legitimate and often excellent. An old laptop has a built-in battery that behaves like a small uninterruptible power supply, and a NAS already runs all the time with real storage. Both come with conditions.
A laptop needs its lid-close and sleep behavior neutralized, or the system will suspend at the worst possible time. Its battery is old by definition; an aged cell that swells is a physical hazard, not merely a performance issue. A NAS running Home Assistant Container inherits the NAS vendor's container runtime, permissions model and upgrade schedule — and, as the installation documentation notes, a Container installation has no app support, which removes the out-of-the-box Thread and Z-Wave paths.
The question that settles reuse is not capability. It is tenancy: does anyone else in the household expect to reboot, unplug or repurpose this machine? A smart home that stops when someone reclaims a laptop for a weekend is not a reliability problem you can fix in software.
Hardware readiness gate
- Meets or exceeds the documented minimums for the chosen install path.
- Wired Ethernet available at the intended location.
- Durable storage plan plus a tested backup and restore.
- Free USB ports, with an extension cable for any radio coordinator.
- Nobody else in the household needs to power this machine down.
- Power arrangement decided, including what happens after an outage.
Leave room for the workloads that arrive later
Installations grow in predictable directions. Cameras add continuous decoding. A local voice pipeline adds speech processing. Local language models add substantially more, and they are the workload most likely to make yesterday's adequate machine feel slow. Long history retention grows storage rather than processor.
You do not need to buy for all of that on day one. You do need to know which direction you are likely to grow, because the cheapest upgrade path is the one you left open. A mini PC with a spare drive bay and free USB ports absorbs three years of ambition. A minimum-specification board with one card slot absorbs the first six months.
The documentation's own framing is the right instinct: assign resources based on your expected workload, and increase them later if the workload grows. Build the system so that increasing them is a scheduled afternoon rather than a rebuild.
Source desk
Primary documentation used for this guide. Interface names and behaviors can change; confirm the current page before changing a live installation.
- InstallationOfficial hardware paths, skills and minimum Raspberry Pi requirements.Official source ↗
- Linux installationOfficial virtual-machine minimums, UEFI requirement and USB pass-through example.Official source ↗
- Home Assistant GreenOfficial ready-made hub with the operating system preinstalled.Official source ↗
Source review completed .
Frequent questions
What Raspberry Pi does Home Assistant documentation list?
The installation page lists a Raspberry Pi 4 or 5 with a power supply and a minimum of 2 GB of RAM, together with a microSD memory card and an Ethernet connection.
How much RAM and how many CPUs does a Home Assistant virtual machine need?
The Linux installation documentation lists minimum virtual-machine resources of 2 GB of RAM and 2 vCPUs, and states that UEFI is required to boot.
Can I run Home Assistant on an old laptop or a NAS?
Yes, both are used in practice. Disable sleep and lid-close suspension on a laptop, and remember that a NAS container installation has no app support, which removes out-of-the-box Thread and Z-Wave.
Do I need Ethernet, or is Wi-Fi acceptable?
The documented tool lists for the ready-made hubs and the Raspberry Pi path name an Ethernet connection. A wired link removes a common source of intermittent connectivity problems.
Why do people put a Zigbee dongle on an extension cable?
To move it away from the chassis and from USB 3.0 ports and cabling, which are a known source of interference in the 2.4 GHz band that Zigbee uses.